Password Protecting Documents
Help protect a sensitive or confidential document from unwanted users by assigning a password.
Learn how to:
- Password protect a document
- Opening a password protected document
- Change the password of a document
- Remove a password from a document
- Password Protect an Excel file
- Remove password protection from an Excel file
- Password protect a presentation
- Remove protection in your PowerPoint presentation
- Password protect a PDF file
- Remove password security from PDF
- Additional Information
Password protect a document
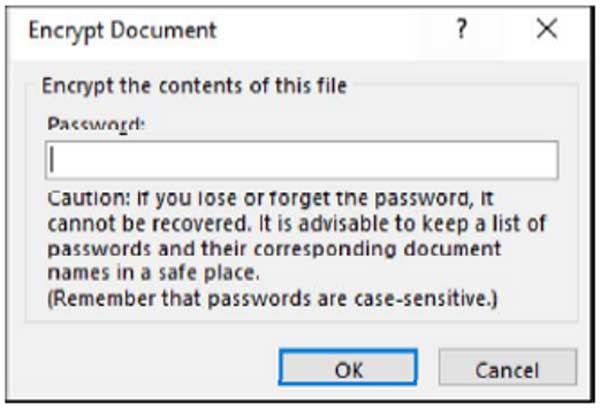
- Click File > Info > Protect Document > Encrypt with Password.
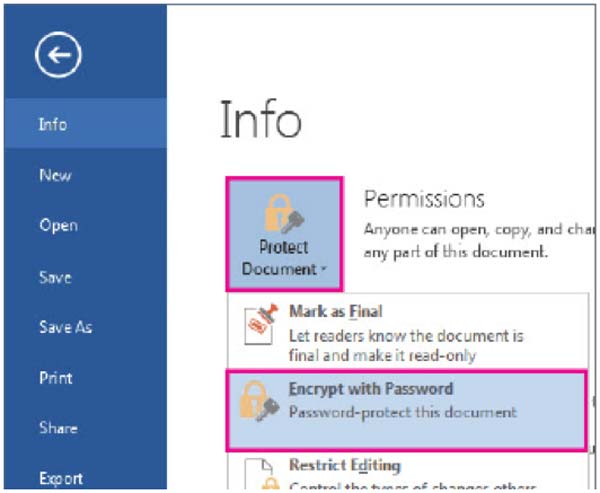
- In the Encrypt Document box, type a password, and then click OK.
- In the Confirm Password box, type the password again, and then click OK.
Opening a password protected document
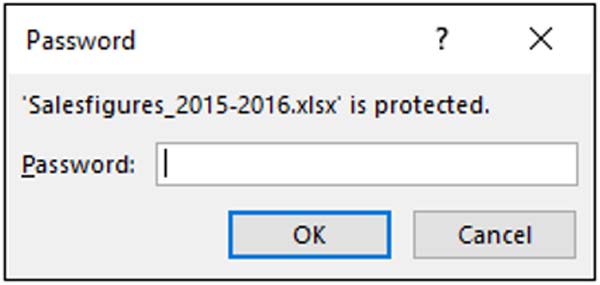
- Open the document and enter the password given to you by the creator and then click OK.

Note: Do not send the password for an encrypted file along with the file itself. For example, if you are sharing an encrypted file through an e-mail message, use a different means of communicating the password to the recipient, such as text or phone call.
Change the password of a document
To change a document's password, you first need to open it with the original password. Once it's open, give it a new password.
- Open the document and enter the original password.
- Click File > Info > Protect Document > Encrypt with Password.
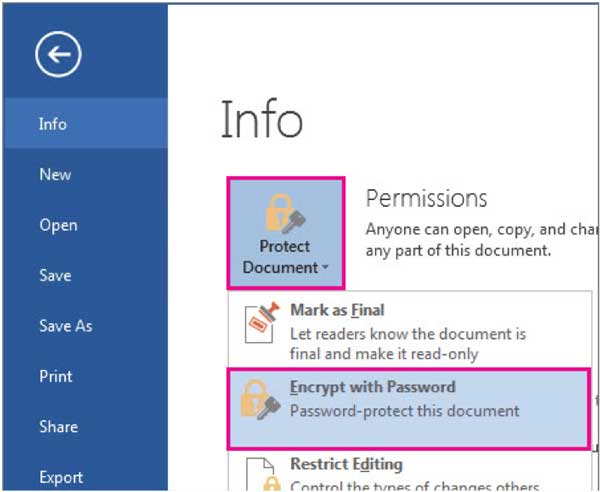
- In the Encrypt Document box, type a password, and then click OK.
- In the Confirm Password box, type the password again, and then click OK.
Remove a password from a document
Removing a password from a document is a simple process, but you have to know the original password. (The way to remove the password is the same process as creating a password and changing it, too.)
- Open the document and enter its password.
- Click File > Info > Protect Document > Encrypt with Password.

- Clear the password in the Password box, and then click OK.
Password Protect an Excel file
You can protect your Excel file with a password to prevent others from accessing data in your Excel files. This topic covers the two different ways you can protect an Excel file — using encryption, and then setting a password to open/modify an Excel file.
Note: This topic covers file-level protection only, and not workbook or worksheet protection.
Encrypt an Excel file
Follow these steps to encrypt an Excel file:
- Click File > Info > Protect Workbook > Encrypt with Password.
- Enter a password, and click OK.
- In the Confirm Password dialog box, reenter the password you entered in the previous step.
When you/another user tries to open the file, the following screen appears:
- To save the password, save the file.
Set a password to allow reading or modifying
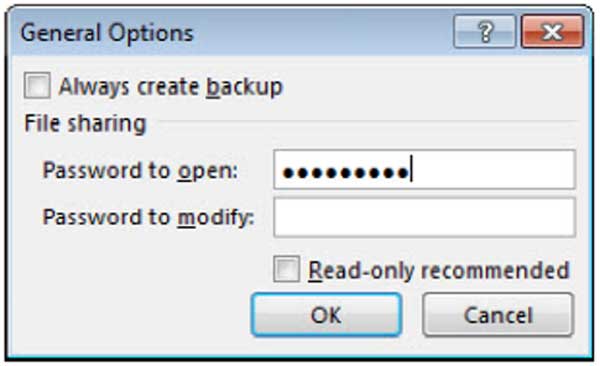
You can set two passwords on the file - one to open the file as read-only, and the other to modify. Then you can share the appropriate passwords with the users depending on the access level they should have.
Read-only access does not prevent someone from making changes to a file, but it does prevent them from saving those changes unless they rename the file and save it as something other than the original. For users who need to be able to modify the file, you will have to share both open and modify passwords.
Follow these steps to set a password to open/modify an Excel file:
- In the Excel file, click File > Save As.
- Click a location, such as Computer or your My Site web page.
- Click a folder, such as Documents or one of the folders on your OneDrive, or click Browse.
- In the Save As dialog box, go to the folder you want to use, then click Tools and then click General Options.
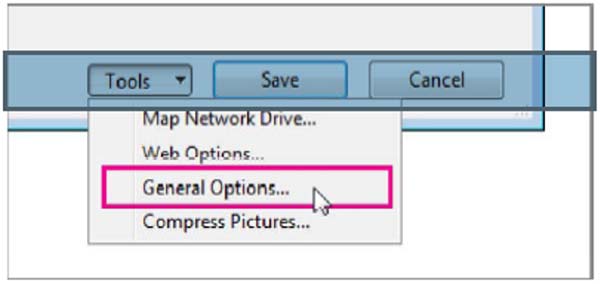
- You can specify one or both passwords here, one to open the file, another to modify the file, depending on your requirements.
- Click Save.
When someone tries to open this file, Excel prompts for a password.

A second screen shows if there is a password to modify the file. Users who don’t have the modify password can click Read Only and start viewing the contents of the file.

Remove password protection from an Excel file
Remove password encryption:
To remove password encryption from the file, open the workbook and enter the password in the Password box. Then click File > Info > Protect Workbook > Encrypt with Password. Delete the contents of the Password box, click OK, and then save the file again.
Password protect a presentation
Help protect a sensitive or confidential presentation from unwanted edits by assigning a password. You can also prevent a presentation from being opened.
- Click File > Info > Protect Presentation > Encrypt with Password
- In the Encrypt Document box, type a password, and then click OK.
- In the Confirm Password box, type the password again, and then click OK.
Remove protection in your PowerPoint presentation
- In an open presentation, click File > Info > Protect Presentation.
You see the following options.
Click Encrypt with Password. Delete the contents of the Password box, click OK, and then save the presentation.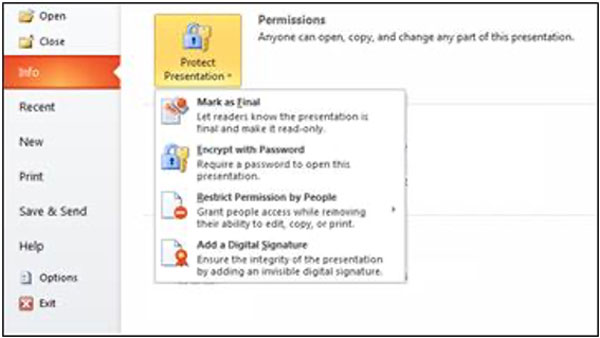
Password protect a PDF file
- Open the PDF and choose Tools > Protect > Encrypt > Encrypt with Password.
- If you receive a prompt, click Yes to change the security.
- Select Require A Password To Open The Document, then type the password in the corresponding field. For each keystroke, the password strength meter evaluates your password and indicates the password strength.

Password Security - Settings let you set a password to open a PDF - Select an Acrobat version from the Compatibility drop-down menu. Choose a version equal to or lower than the recipients’ version of Acrobat or Reader.
Options control compatibility with previous versions and type of encryption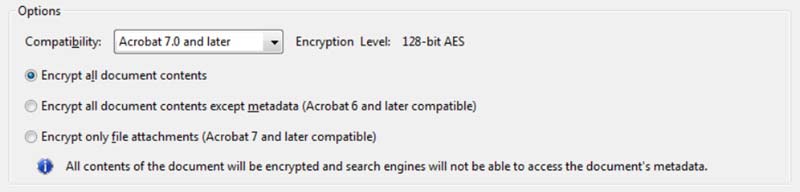
The Compatibility option you choose determines the type of encryption used. It is important to choose a version compatible with the recipient's version of Acrobat or Reader. For example, Acrobat 7 cannot open a PDF encrypted for Acrobat X and later.- Acrobat 6.0 And Later (PDF 1.5) encrypts the document using 128-bit RC4.
- Acrobat 7.0 And Later (PDF 1.6) encrypts the document using the AES encryption algorithm with a 128-bit key size.
- Acrobat X And Later (PDF 1.7) encrypts the document using 256-bit AES. To apply 256-bit AES encryption to documents created in Acrobat 8 and 9, select Acrobat X and Later.
- Select an encryption option:
- Encrypt All Document Contents
Encrypts the document and the document metadata. If this option is selected, search engines cannot access the document metadata. - Encrypt All Document Contents Except Metadata
Encrypts the contents of a document but still allows search engines access to the document metadata. - Encrypt Only File Attachments
Requires a password to open file attachments. Users can open the document without a password. Use this option to create security envelopes.
- Encrypt All Document Contents
- Click OK. At the prompt to confirm the password, retype the appropriate password in the box and click OK.
- Save the document
Remove password security from PDF
You can remove security from an open PDF if you have the permissions to do so.
- Open the PDF, then select Tools > Protect > Encrypt > Remove Security.
- Your options vary depending on the type of password security attached to the document:
- If the document had only a Document Open password, click OK to remove it from the document.
- If the document had a permissions password, type it in the Enter Password box, and then click OK. Click OK again to confirm the action.
- Save the Document
Additional Information
- IT can’t retrieve forgotten passwords. It might be a good idea to keep a copy of your password in a safe place or create a strong password that you’ll remember.
- There are no restrictions on the passwords you use with regards to length, characters or numbers, but passwords are case-sensitive. Make sure that the Caps Lock key is turned off when you enter a password for the first time.
- It’s not always secure to distribute password-protected files that contain sensitive information such as credit card numbers.
- Be cautious when sharing files or passwords with other users. You still run the risk of passwords falling into the hands of unintended users. Remember that locking a file with a password does not necessarily protect your file from malicious intent.